4 Amps Photovoltaic Solar Charge Controller Circuit

The use of solar photovoltaic (PV) energy sources is increasing due to global warming concerns on the one hand, and cost effectiveness on the other. Many engineers involved in power electronics find solar power tempting and then addictive due to the ‘green’ energy concept. The circuit discussed here handles up to 4 amps of current from a solar panel, which equates to about 75 watts of power. A charging algorithm called ‘pulse time modulation’ is introduced in this design. The current flow from the solar panel to the battery is controlled by an N-channel MOSFET, T1. This MOSFET does not require any heat sink to get rid of its heat, as its RD-S(on) rating is just 0.024 Ω.

Schottky diode D1 prevents the battery discharging into the solar panel at night, and also provides reverse polarity protection to the battery. In the schematic, the lines with a sort-of-red highlight indicate potentially higher current paths. The charge controller never draws current from the battery—it is fully powered by the solar panel. At night, the charge controller effectively goes to sleep. In daytime use, as soon as the solar panel produces enough current and voltage, it starts charging the battery. The battery terminal potential is divided by resistor R1 and trimpot P1.

4 Amps Photovoltaic Solar Charge Controller Circuit Diagram

4 Amps Photovoltaic Solar Charge Controller Circuit


 The resulting voltage sets the charge state for the controller. The heart of the charge controller is IC1, a type TL431ACZ voltage reference device with an open-collector error amplifier. Here the battery sense voltage is constantly compared to the TL431’s internal reference voltage. As long as the level set on P1 is below the internal reference voltage, IC1 causes the MOSFET to conduct. As the battery begins to take up the charge, its terminal volt- age will increase. When the battery reaches the charge-state set point, the output of IC1 drops low to less than 2 volts and effectively turns off the MOSFET, stopping all current flow into the battery.


With T1 off, LED D2 also goes dark. There is no hysteresis path provided in the regulator IC. Consequently, as soon as the current to the battery stops, the output of IC1 remains low, preventing the MOSFET to conduct further even if the battery voltage drops. Lead-acid bat- tery chemistry demands float charging, so a very simple oscillator is implemented here to take care of this. Our oscillator exploits the negative resistance in transistors—first discovered by Leo Esaki and part of his studies into electron tunneling in solids, awarded with the Nobel Prize for Physics in 1973. In this implementation, a commonplace NPN transistor type 2SC1815 is used.

When the LED goes out, R4 charges a 22-μF capacitor (C1) until the voltage is high enough to cause the emitter-base junction of T2 to avalanche. At that point, the transistor turns on quickly and discharges the capacitor through R5. The voltage drop across R5 is sufficient to actuate T3, which in turn alters the reference voltage setting. Now the MOSFET again tries to charge the battery. As soon as the battery voltage reaches the charged level once more, the process repeats. A 2SC1815 transistor proved to work reliably in this circuit. Other transistors may be more temperamental—we suggest studying Esaki’s laureate work to find out why, but be cautioned that there are Heavy Mathematics Ahead.

As the battery becomes fully charged, the oscillator’s ‘on’ time shortens while the ‘off’ time remains long as determined by the timing components, R4 and C1. In effect, a pulse of current gets sent to the battery that will shorten over time. This charging algorithm may be dubbed Pulse Time Modulation. To adjust the circuit you’ll need a good digital voltmeter and a variable power supply. Adjust the supply to 14.9 V, that’s the 14.3 volts bat- tery setting plus approximately 0.6 volts across the Schottky diode.

Turn the trimpot until at a certain point the LED goes dark, this is the switch point, and the LED will start to flicker. You may have to try this adjustment more than once, as the closer you get the comparator to switch at exactly 14.3 V, the more accurate the charger will be. Disconnect the power supply from the charge controller and you are ready for the solar panel. The 14.3 V setting mentioned here should apply to most sealed and flooded-cell lead-acid batter- ies, but please check and verify the value with the manufacturer. Select the solar panel in such a way that its amps capability is within the safe charging limit of the battery you intend to use.

Resistors:
R1 = 15kΩ
R2,R3 = 3.3kΩ 1% R4 = 2.2MΩ
R5 = 1kΩ
P1 = 5kΩ preset

Capacitors:
C1 = 22μF 25V, radial

Semiconductors:
D1 = MBR1645G (ON Semiconductor) D2 = LED, 5mm
IC1 = TL431ACLP (Texas instruments)
T1 = IRFZ44NPBF (International Rectifier)
T2 = 2SC1815 (Toshiba) (device is marked: C1815)
T3 = BC547

Miscellaneous:
K1,K2 = 2-way PCB terminal block, lead pitch 5mm


Author: T. A. Babu (India - Elektor)

  • Digg
  • Del.icio.us
  • StumbleUpon
  • Reddit
  • RSS

Simple Solar Relay Circuit Diagram

Build a Simple Solar Relay Circuit Diagram.With extended periods of bright sunshine and warm weather, even relatively large storage batteries in solar-power systems can become rather warm. Consequently, a circuit is usually connected in parallel with the storage battery to either connect a high-power shunt (in order to dissipate the excess solar power in the form of heat) or switch on a ventilation fan via a power FET, whenever the voltage rises above approximately 14.4 V. However, the latter option tends to oscillate, since switching on a powerful 12-V fan motor causes the voltage to drop below 14.4 V, causing the fan to be switched off. In the absence of an external load, the battery voltage recovers quickly, the terminal voltage rises above 14.4 V again and the switching process starts once again, despite the built-in hysteresis.


Simple Solar Relay Circuit Diagram

A solution to this problem is provided by the circuit shown here, which switches on the fan in response to the sweltering heat produced by the solar irradiation instead of an excessively high voltage at the battery terminals. Based on experience, the risk of battery overheating is only present in the summer between 2 and 6 pm. The intensity of the sunlight falling within the viewing angle of a suitably configured ‘sun probe’ is especially high precisely during this interval. This is the operating principle of the solar relay.
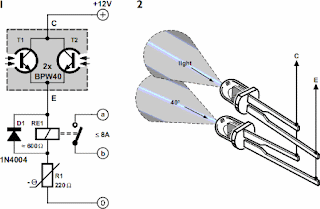
The trick to this apparently rather simple circuit consists of using a suitable combination of components. Instead of a power FET, it employs a special 12-V relay that can handle a large load in spite of its small size. This relay must have a coil resistance of at least 600 Ω, rather than the usual value of 100-200 Ω. This requirement can be met by several Schrack Components relays (available from, among others, Conrad Electronics). Here we have used the least expensive model, a type RYII 8-A printed circuit board relay. The light probe is connected in series with the relay. It consists of two BPW40 photo-transistors wired in parallel.
 
The type number refers to the 40-degree acceptance angle for incident light. In bright sunlight, the combined current generated by the two photo-transistors is sufficient to cause the relay to engage, in this case without twitching. Every relay has a large hysteresis, so the fan connected via the a/b contacts will run for many minutes, or even until the probe no longer receives sufficient light. The NTC thermistor connected in series performs two functions. First, it compensates for changes in the resistance of the copper wire in the coil, which increases by approximately 4 percent for every 10 ºC increase in temperature, and second, it causes the relay to drop out earlier than it otherwise would (the relay only drops out at a coil voltage of 4 V).

Depending on the intended use, the 220-Ω resistance of the thermistor can be modified by connecting a 100-Ω resistor in series or a 470-Ω resistor in parallel. If the photo-transistors are fastened with the axes of their incident-angle cones in parallel, the 40-degree incident angle corresponds to 2 pm with suitable solar orientation. If they are bent at a slight angle to each other, their incident angles overlap to cover a wider angle, such as 70 degrees. With the tested prototype circuit, the axes were oriented nearly parallel, and this fully met our demands. The automatic switch-off occurs quite abruptly, just like the switch-on, with no contact jitter. This behavior is also promoted by the NTC thermistor, since its temperature coefficient is opposite to that of the ‘PTC’ relay coil and approximately five times as large.
This yields exactly the desired effect for energizing and DE-energising the relay: a large relay current for engagement and a small relay current for disengagement. Building the circuit is actually straightforward, but you must pay attention to one thing. The photo transistors resemble color less LEDs, so there is a tendency to think that their ‘pinning’ is the same as that of LEDs, with the long lead being positive and the short lead negative. However, with the BPW40 the situation is exactly the opposite; the short lead is the collector lead. Naturally, the back-emf diode for the relay must also be connected with the right polarity. The residual current on cloudy days and at night is negligibly small.


  • Digg
  • Del.icio.us
  • StumbleUpon
  • Reddit
  • RSS

Build a Fog Lamp Switch Circuit Diagram

This is a simple Fog Lamp Switch Circuit Diagram. This circuit recommended to have a rear fog light on a trailer with the additional requirement that, when the trailer is coupled to the car, the rear fog light of the towing car has to be off. The circuit shown here is eminently suitable for this application. The circuit is placed near the rear fog light of the car. The 12-V connection to the lamp has to be interrupted and is instead connected to relay contacts 30 and 87A (K1, K3). When the rear fog light is turned on it will continue to operate normally.

 Fog Lamp Switch Circuit Diagram

Fog Lamp Switch Circuit Diagram


If a trailer with fog light is now connected to the trailer connector (7- or 13-way, K2), a current will flow through L1. L1 is a coil with about 8 turns, wound around reed contact S1. S1 will close because of the current through L1, which in turn energizes relay Re1 and the rear fog light of the car is switched off. The fog light of the trailer is on, obviously. The size of L1 depends on reed contact S1. The fog lamp is 21 W, so at 12 V there is a current of 1.75 A. L1 is sized for a current between 1.0 and 1.5 A, so that it is certain that the contact closes. The wire size has to be about 0.8 mm. The relay Re1 is an automotive relay that is capable of switching the lamp current. The voltage drop across L1 is negligible. 
 
 
Author : J. Geene Copyright :Elektor Electronics 2008

  • Digg
  • Del.icio.us
  • StumbleUpon
  • Reddit
  • RSS

Sound-Operated Switch for Lamps Circuit Diagram

This inexpensive, fully transistorised switch is very sensitive to sound signals and turns on a lamp when you clap within 1.5 metres of the switch. One of its interesting applications is in discotheques, where lights could be turned on or off in sync with the music beats or clapping.

Sound-Operated Switch for Lamps Circuit Diagram


The condenser microphone senses the sound and converts it into electrical variations. The electrical signals are amplified by the two-stage direct-coupled (DC) amplifier formed by transistors T1 and T2 and fed to the switching circuit. The switching circuit comprises transistors T3, T4 and T5, which conduct only when the circuit senses sound signals. Transistor T5 supplies sufficient gate voltage to the triac to drive the 230V lamp.

The regulated 12V DC power supply for the circuit is derived from AC mains by using resistor R14, diode D1 and zener diode ZD1. The circuit can be assembled on any general-purpose PCB.


Soursed By: EFY: Author Pradeep G.

  • Digg
  • Del.icio.us
  • StumbleUpon
  • Reddit
  • RSS

TV Pattern Generator Circuit Diagram

This single-IC TV pattern generator is useful for fault finding in TV sets. You can correct the alignment of the timing circuits of the TV set with the help of this circuit. The vertical stripes (bars) produced by the pattern generator on the TV screen help you align the vertical scanning synchronisation circuit of the receiver.

To test the TV set, you need to connect the video and audio outputs of the circuit to the respective inputs of the TV set one by one. If the video section of the TV set is working the circuit generates vertical white lines on the TV screen, and if the audio section is working you hear sound from the TV’s speakers. You can also adjust the width of vertical lines.

TV Pattern Generator Circuit Diagram

TV Pattern Generator Circuit Diagram

The circuit uses hex Schmitt inverter IC CD40106 (IC1). NOT gate N1 generates horizontally synchronised (Hsync) pulses for the PAL video signal. Presets VR1 and VR2 are used to control the ‘on’ and ‘off’ time durations of the oscillator, respectively. For PAL, you need to adjust VR2 for ‘off’ duration of 4.7 µs, while VR1 needs to be adjusted for ‘on’ duration of around 60 µs.

If vertical lines appear on the TV screen on connecting the video output of the circuit to the video input of the TV, the video section of the TV set is working. You can control the starting position of the lines using potmeter VR3, the end position of the lines using potmeter VR4, and the line width and the number of lines using potmeter VR5.

If you don’t have an oscilloscope, set presets VR1 and VR2 to 150k and 22k, respectively, to get the required ‘on’ and ‘off’ periods for the oscillator and see the vertical line pattern on the TV.

The audio frequency oscillator is built around NOT gate N6. Its oscillation frequency is decided by resistor R6 and capacitor C5. Connect the audio output of the circuit to the audio input of the TV. If you hear sound from the TV’s speakers, the audio section of the TV set is working.


Sourced By : EFY Author Name  S. Anantha Narayanan

  • Digg
  • Del.icio.us
  • StumbleUpon
  • Reddit
  • RSS

Simple Accurate Foot-Switch Circuit Diagram

Certain industrial controls require accurate switching operations. For example, in case of a foot-switch for precise drilling work, even a small error in switching may cause considerable loss. This low-cost but accurate foot-operated switch can prevent that.

IC NE555 is wired in one-shot mode. Its output pin 3 goes high only when both switches S1 and S2 are pressed simultaneously. You can release any one of the switches without changing the output state. When you release both the switches, the output goes low.

Simple Accurate Foot-Switch Circuit Diagram

Simple Accurate Foot-Switch Circuit Diagram

The switches are placed under a foot paddle as shown in Fig. 2. LED1 is used as a warning indicator. If either S1 or S2 gets pressed erroneously, LED1 blinks to warn the operator. The operator can then withdraw his foot in case of a mistake or depress the other switch also to trigger the circuit. LED1 is to be mounted on the operator’s desk.

The circuit operation is simple. Resistors R2, R3 and R4 form a voltage divider. IC NE555 has two comparators, a flip-flop and power output section built into it. Pressing either S1 or S2 puts the input voltage between the upper comparator (2/3Vcc) and the lower comparator (1/3Vcc). Thus, it has no effect on the state of the internal flip-flop of IC NE555. Pressing the two switches simultaneously sets the flip-flop and the output of NE555 goes high. Transistor T2 energises relay RL1 for driving the load.


Releasing any of the switches brings the comparator voltage back to the initial level inside NE555 and it has no effect on the state of the flip-flop. Releasing both the switches brings the input level with respect to ground below the low trigger level, and thus it resets the output.

Use of the voltage divider results in stable operation over the entire permissible supply voltage range. The RC circuit at pin 4 provides power-on reset.

When only S1 is pressed, R3 (1 kilo-ohm) is less than R5 (1.5 kilo-ohms) and IC1 is not triggered. However, transistor T1 (BC548) gets forward biased and LED1 glows. When both S1 and S2 are pressed, the effective resistance between +Vcc and pin 2 of IC1 is about 500 ohms, which is less than R5 (1.5 kilo-ohms), and IC NE555 gets triggered.


Sourced By: EFY Author Name : Kaushik Hazarika

  • Digg
  • Del.icio.us
  • StumbleUpon
  • Reddit
  • RSS

Automatic Bathroom Light with Back-up Lamp Circuit Diagram

Sometimes we forget to switch off the bathroom light and it remains on unnoticed for long periods. This circuit solves the problem of electricity wastage by switching off the lamp automatically after 30 minutes once it is switched on. The back-up LED lamp provided in the circuit turns on for three minutes when mains fails. This is helpful especially when you are taking a shower at night.

The circuit is built around binary counter CD4060 (IC2), which has a built-in oscillator and 14 cascaded bistable multivibrators. The oscillator generates clock pulses based on the values of resistors R3 and R4 and capacitor C3.

Automatic Bathroom Light with Back-up Lamp Circuit Diagram

Automatic Bathroom Light with Back-up Lamp Circuit Diagram
 

For the given values, Q11 output of IC2 goes high after 30 minutes of power-on. Resistor R2 resets the IC for proper operation. The output of IC2 is fed to the gate of the SCR via resistor R6 and LED2, which function as a voltage dropper as well as output status indicator.

When the SCR gets gate drive, it fires to energise relay RL1. The latching function of the SCR keeps the relay energised until the power to the circuit is switched off using switch S1. When the relay energises, its normally closed (N/C) contacts break and light turns off. LED1 indicates that the oscillator is working.

The back-up white-LED lamp comprising LED3 and LED4 gives ample light in the event of mains failure. It is powered by a 9V rechargeable battery, which is charged at around 200mA current via diode D6 and resistor R7 when the circuit is switched on.

The back-up lamp circuit is built around timer NE555 (IC3) designed as a monostable. The output of IC3 goes high for three minutes based on the values of preset VR1 and capacitor C9. When the circuit is switched on, IC3 gets power supply via diode D6 and its trigger pin 2 remains high due to resistor R8. As a result, its output remains low as long as mains is present.


When power fails, pin 2 of IC3 get striggered via capacitor C8 and the monostable output goes high to switch on the white LEDs (LED3 and LED4). Resistor R9 limits the current through the LEDs to a safe level. Diode D7 is forward biased to give full voltage to the monostable when power fails.

The power supply for the circuit is derived from a 15V AC, 250mA transformer. The secondary output is rectified by a full-wave rectifier comprising diodes D1 through D4. Capacitor C1 smoothes the resulting DC. Regulator IC 7812 (IC1) and capacitors C4 and C5 provide stabilised 12V for the circuit.

Assemble the circuit on a Vero board and enclose it in a watertight plastic case. Connect the bathroom lamp (either 25-watt bulb or 11-watt CFL tube) to the circuit via N/C contacts of the relay, so that it turns on when switch S1 is pressed. For easy access, fix switch S1 along with the neon indicator outside the bathroom.

Sourced By EFY Author D. Mohn Kumar

  • Digg
  • Del.icio.us
  • StumbleUpon
  • Reddit
  • RSS

Mains Interruption Counter with Indicator Circuit Diagram

This circuit counts mains supply interruptions (up to 9) and shows the number on a 7-segment display. It is highly useful for automobile battery chargers. Based on the number of mains interruptions, the user can extend the charging time for lead-acid batteries.

Mains Interruption Counter Circuit Diagram

Mains Interruption Counter Circuit Diagram

Fig. 1 shows the circuit of the interruption counter with indicator. A 9V (PP3 or 6F22) battery powers the entire circuit. Fig. 2 shows the block diagram of the mains interruption counter circuit along with the battery charger and lead-acid battery as used in automobile battery charger shops.When 9V is applied to the circuit, IC2 is reset by the power-on-reset signal provided by capacitor C3 and resistor R5 and the 7-segment display (DIS1) shows ‘0.’ The 230V AC mains is fed to mains-voltage detection optocoupler IC MCT2E (IC1) via capacitor C1 and resistors R1 and R2 followed by bridge rectifier BR1, smoothing capacitor C2 and current-limiting resistor R2. Illumination of the LED inside optocoupler IC1 activates its internal phototransistor and clock input pin 1 of IC2 is pulled down to low level.

Mains Interruption Counter Circuit Diagram  2


IC CD4033 (IC2) is a decade counter/7-segment decoder. Its pin 3 is held high so that the display initially shows ‘0.’ Clock pulses are applied to clock input pin 1 and clock-enable pin 2 is held low to enable the counter.Seven-segment, common-cathode display DIS1 (LTS543) indicates the mains interruption count. Capacitor C2 provides a small turn-on delay for the display.When mains fails for the first time, clock input pin 1 of IC2 again goes high and display DIS1 shows ‘1.’ When mains resumes, pin 1 of IC2 goes low and DIS1 continues to show ‘1.’ When mains fails for the second time, clock input pin 1 of IC2 goes high and display DIS1 shows ‘2.’ When mains resumes, pin 1 of IC2 again goes low and DIS1 continues to show ‘2.’ This way, the counter keeps incrementing by ‘1’ on every mains interruption. Note that this circuit can count up to nine mains interruptions only.

Sourced By: EFY Author:  T.K. Hareendran

  • Digg
  • Del.icio.us
  • StumbleUpon
  • Reddit
  • RSS

Power-on Reminder with LED Lamp Circuit Diagram

D. Mohan Kumar is famous name in the circuits world. There are d's Power-on Reminder with LED Lamp Circuit Diagram creation. Many a times equipment at workstations remain switched on unnoticed. In this situation, these may get damaged due to overheating. Here is an add-on device for the workbench power supply that reminds you of the power-on status of the connected devices every hour or so by sounding a buzzer for around 20 seconds. It also has a white LED that provides good enough light to locate objects when mains fails.

Power-on Reminder with LED Lamp Circuit Diagram

Power-on Reminder with LED Lamp Circuit Diagram
 
 Fig. 1 shows the circuit of power-on reminder with LED lamp. Here, IC NE555  (IC1) is wired as an astable multivibrator, whose time period is set to around six minutes using resistors R1 and R2, preset VR1 and capacitor C1 for sounding the buzzer every hour. The output of IC1 is fed to the clock input of IC CD4017 (IC2). Capacitor C3 and resistor R3 provide power-on-reset pulse to IC2.When power to the circuit is switched on, pin 3 of IC2 goes high. After around one hour, its output pin 11 (Q9) goes high and the buzzer sounds. This cycle repeats until the two npn transistors. The LDR offers a very high resistance in darkness, i.e., when no light falls on it. Therefore when power fails, transistor T1 gets reverse biased to drive transistor T2 and the white LED (LED2) glows. The lamp circuit is powered by a 9V rechargeable battery, which is charged via resistor R5 when mains is present. Thus in darkness, the LED remains power to the circuit is switched off.

Power-on Reminder with LED Lamp Circuit Diagram 1

 The automatic lamp is built around a light-dependent resistor (LDR) and ‘on.’Fig. 2 shows the power supply circuit. The AC mains is stepped down by transformer X1 to deliver a secondary output of 15V AC at 500 mA. The transformer output is rectified by a bridge rectifier comprising diodes D1 through D4, filtered by capacitor C5 and regulated by IC 7812 (IC3) to provide regulated 12V to the circuit. Capacitor C6 bypasses any ripple in the regulated output.

Sourced By: EFY Author D. Mohn Kumar

  • Digg
  • Del.icio.us
  • StumbleUpon
  • Reddit
  • RSS

Simple Low-Power Inverter Circuit Diagram

Here is a simple low-power inverter that converts 12V DC into 230-250V AC. It can be used to power very light loads like window chargers and night lamps, or simply give shock to keep the intruders away. The circuit is built around just two ICs, namely, IC CD4047 and IC ULN2004.IC CD4047 (IC1) is a monostable/astable multivibrator. It is wired in astable mode and produces symmetrical pulses of 50 to 400 Hz, which are given to IC2 via resistors R1 and R2.

Simple Low-Power Inverter Circuit Diagram
 
Simple Low-Power Inverter Circuit Diagram

IC ULN2004 (IC2) is a popular 7-channel Darlington array IC. Here, the three Darlington stages are paralleled to amplify the frequencies received from IC1. The output of IC2 is fed to transformer X1 via resistors R3 and R4.Transformer X1 (9V-0-9V, 500mA secondary) is an ordinary step-down transformer that is used here for the reverse function, i.e., step up. That means it produces a high voltage. Resistors R3 and R4 are used to limit the output current from the ULN to safe values. The 230-250V AC output is available across the high-impedance winding of the transformer’s primary windings.

Sourced By: EFY Author: Pradeep G.

  • Digg
  • Del.icio.us
  • StumbleUpon
  • Reddit
  • RSS

Build a 100 Watt Inverter Circuit Diagram

This is a 100 Watt Inverter Circuit Diagram with Veroboard Print (LOW COST). This 100 watt Inverter Circuit use Minimum number of Components.I think it is quit difficult to make a decent one like this with further less components.Here we use {CD 4047 IC} for generating the 100 Hz pulses and four {2N3055} Transistor for driving the load.The IC1 {CD 4047} wired as an Astable  multi vibrator produces two 180 degree out of phase 100 Hz pulse train.These pulse train are preamplifier by the two TIP122

100 Watt Inverter Circuit Diagram

Build a 100 Watt Inverter Circuit Diagram


Transistor.The output of the TIP122 Transistor are amplified by fout 2N3055 Transistor {Two transistor for each of half cycle} to drive the inverter transformer.The 220 AC be available at a secondary of the transformer.Nothing complex just the elementary inverter principle and the circuit great for small load like a few savers or fans.This is LOW COST inverter only 7 $.

Info
  •     12v Car Battery can be use for this Inverter Circuit.
  •     Use the P1 to set the output frequency  to 50 Hz.
  •      Use STEP DOWN TRANSFORMER 220 to 12v.CONNECTED IN REVERSE BAIS.
  •     Transformer 10 amp and winding 12-0-12 to Primary & Secondary.
  •     Mount the IC on a IC holder.
  •     Remember this  circuit is nothing when compared the advanced PWM {Pulse width Modulation}.

  • Digg
  • Del.icio.us
  • StumbleUpon
  • Reddit
  • RSS

Simple 500 Watt Inverter Circuit Diagram

This is a Simple 500 Watt Inverter Circuit Diagram. Power inverter is a very useful device which can convert Low voltage from a DC source to high voltage AC. The most common power inverter is 12V to 240V inverter. Perhaps that is because 12V batteries are common. This type of power inverter usually draws current from a DC battery. This battery should be able to provide a high flow of electric current. Normally lead acid batteries can server this purpose well. This current is then converted to 240V square wave alternative current so that we may empower those electric appliances which work on 240V instead of 12V. Inverter falls in the category of expensive devices so many people don’t buy them even they need them. What if I tell you how to build an inverter yourself?

Simple 500 Watt Inverter Circuit Diagram

Simple 500 Watt Inverter Circuit Diagram

I remember when I build my first inverter, I was very happy and I invited a lot of friends to see my homemade inverter. I am sure you will feel the same. Before you start building this inverter circuit diagram, I want to mention that this circuit involves 240V and 500W which can be fatal. You should take all security precautions before building this circuit. Preferably use electricity protective gloves and try not to play with the inverter circuit when it is operational. You will need little to medium knowledge of electronics in order to build this circuit. Alright, let us get to work. There are a lot of inverter circuit diagrams available online; some of them are complex and others are low performance. I have researched on a lot of them but in the end, I designed my own inverter circuit which is comparable to any professionally made inverter but still is simple enough for you to try

NOTE:

There is only one variable resistance in this circuit diagram which is used to adjust frequency of 240V AC output current. You should have a frequency meter to adjust this frequency of 50HZ to 60HZ as per your requirement. Please do not power up any device with your inverter before frequency adjustment because a wrong AC frequency can burn your equipment as well as your inverter.

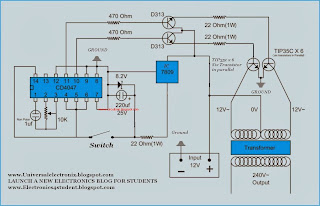
I have used a two stage regulated power supply to avoid frequency changes with the drop of battery voltage. First stage is 7809 which is a standalone voltage regulator. It converts 12V DC to 9V DC. Then we have used a 22 Ohm resistor and then a zener diode of 8.2V which forces current to stay at 8.2V. The 22 Ohm resistor is there just to aid zener diode. The output frequency of this inverter circuit is square wave so it is not best to power up inductive loads so use it at your own risk. However I do power up fans at home using this inverter and I never had any problems other than a little decrease in fan speed and addition of a little noise

Sourced By : www.circuitsproject.com

PARTS:

1. 2 Resisters 470 Ohm ¼ Watt
2. 3 Resisters 22 Ohm 1 Watt
3. 1 Variable resister 10K
4. 1 Capacitor1uf
5. 1 Capacitor 220uf
6. 1 Zener diode 8.2V
7. 1 IC CD4047
8. 1 IC 7809
9. 1 Transformer 12+12/240 (500W)
10. 2 Transistors D313
11. 12 Power Transistors TIP35C (make two pairs of 6 transistors each connected in parallel)
12. 2 Heat sinks to fit power transistors
13. Some wiring wire (for connections)
14. A Viro-board (To build circuit on)
15.A 12V battery of 12V power supply for testing purposes

  • Digg
  • Del.icio.us
  • StumbleUpon
  • Reddit
  • RSS

1.5.4.5V to 9V Converter Circuit Diagram

This is a Simple1.5.4.5V to 9V Converter Circuit Diagram. Build a Simple1.5.4.5V to 9V Converter Circuit Diagram.

1.5.4.5V to 9V Converter Circuit Diagram


Simple1.5.4.5V to 9V Converter Circuit Diagram

1.5.4.5V to 9V Converter Circuit Diagram


Simple1.5.4.5V to 9V Converter Circuit Diagram

  • Digg
  • Del.icio.us
  • StumbleUpon
  • Reddit
  • RSS

Simple 3 volt to 9 volt with LMC555 Circuit Diagram

Build a 3 volt to 9 volt with LMC555 Circuit Diagram. This is a Build a 3 volt to 9 volt with LMC555 Circuit Diagram. This dc converter is built with the CMOS version of 555 timer. You can get 12V too if you change the zener diode to a 12V version.

3 volt to 9 volt with LMC555 Circuit Diagram

Build a 3 volt to 9 volt with LMC555 Circuit Diagram

  • Digg
  • Del.icio.us
  • StumbleUpon
  • Reddit
  • RSS

1.5V Battery to 5V Voltage Converter Circuit Diagram

This is a Simple 1.5V Battery to 5V Voltage Converter Circuit Diagram. Stable and secure 5V DC (at 200mA max) from an ordinary 1.5V AA sized cell. At the heart of this circuit is IC1 MAX756 from Maxim, which is a CMOS step-up DC-DC switching regulator for small, low input voltage or battery-powered systems.
 

Simple 1.5V Battery to 5V Voltage Converter Circuit Diagram

Simple 1.5V Battery to 5V Voltage Converter Circuit Diagram
MAX756 accepts a positive input voltage down to 0.7V and converts it to a higher pin selectable output voltage of 5V (or 3.3V). Typical full-load efficiency for the this IC is greater than 87%. Max756 combine a switch-mode regulator with an N-channel MOSFET, precision voltage reference, and power-fail detector in a single monolithic device. The MOSFET is a “sense-FET” type for best efficiency, and has a very low gate threshold voltage to ensure start-up under low-battery voltage conditions (1.1V typ).
The circuit can be easily wired on a very small rectangular common PCB.All connections should be kept as short as possible. If available,try to add a good quality 8 pin DIP socket for IC1. Note that the power inductor’s (L1) DC resistance significantly affects efficiency. For highest efficiency, limit L1’s DC resistance to 0.03 Ohm or less. A thru-hole type standard power inductor can be used. Similarly, the ESR of all capacitors (bypass and filter) affects circuit efficiency. Best performance is obtained by using specialized low-ESR capacitors.

  • Digg
  • Del.icio.us
  • StumbleUpon
  • Reddit
  • RSS

10 Watt Audio Power Amplifier Circuit Diagram

Build 10 Watt Audio Power Amplifier Circuit
10 Watt Audio Power Amplifier Circuit Diagram
 
10W PA.The 10 watts power amplifier circuit by transistor describe here is an audio amplifier with output power of 10W.Used as a low frequency class AB Amplifier. Transistor has high output current and very low distortion.This 10W audio amplifier circuit diagram using Transistor is good for small room or car audio system.This circuit is a general-purpose 10W audio amplifier for moderate-power PA or modulator use in an AM transmitter.
With higher voltages and a change in bias resistors,up to 30 W can be obtained.  Sourced by: Circuitsstream

  • Digg
  • Del.icio.us
  • StumbleUpon
  • Reddit
  • RSS

Simple 220V Live Wire Scanner Circuit

This simple circuit lets you scan a 220V live wire. The clock input of the IC is connected to a wire, which acts as the sensor. Here, we have used 10cm length of 22SWG wire as the sensor.

When you hold the sensor (metallic conductor or copper wire) close to the live wire, electric field from mains activates the circuit. As the input impedance of the CMOS IC is high, the electric field induced in the sensor is sufficient to clock it. The output obtained at pin 11 of CD4017 drives the LED. Flashing of the LED (LED2) indicates the presence of mains, while LED1 indicates that the scanner is active.

220V Live Wire Scanner Circuit Diagram

220V Live Wire Scanner Circuit


The circuit can be used to find stray leakage from electrical appliances like fans, mixers, refrigerators, etc. It can be easily assembled on any general-purpose board or the discrete components can be directly soldered on the IC.

A 9V PP3 battery powers the circuit. If you use a mains adaptor, make sure that it is well regulated and isolated; otherwise, even the stray electric field from mains transformer will clock the circuit.

Caution. Use insulated wire as sensor to avoid risk of exposure to live AC mains.


Author: T.A. Babu EFY

  • Digg
  • Del.icio.us
  • StumbleUpon
  • Reddit
  • RSS

Simple Light Dimmer that Doubles as Voltmeter Circuit

Measure AC mains voltage without using a multimeter. All you need to do is to slightly modify the light dimmer fitted at the base of a table lamp for use as a voltmeter. When the dimmer is turned anticlockwise to a point where the filament glow is just visible, that point can be used as the reference point for measuring the voltage.

Light dimmer Circuit Diagram

Light dimmer Circuit Diagram

First, remove the old knob and fix a circular white paper around the shaft. Now put back a skirted knob with a cursor as close to the paper as possible and mark two extremities of the pot on the paper as CW and ACW (see Fig. 2).

AC volts scale marking

AC volts scale marking


Switch on the lamp via a variac and feed 50 volts. Rotate the potmeter knob anticlockwise until the filament glow is just visible and mark that point against the cursor as 50V. Keep on increasing the voltage to 100, 150, 180, 200 and 220 using the variac and calibrating the scale for all the voltages. Now a voltage scale is created. The only snag is that the voltage is increasing in anti-clock-wise direction, which should not be a problem. The scale will not however be linear unlike the one shown in the sketch. Accuracy will depend on the calibration standard used and the tolerance is of the order of 1 percent ±5 volts. The diameter of the knob of potmeter and fineness of cursor can be of help in getting better accuracy and tolerance.

Pin configuration of BT134

Pin configuration of BT134


An ordinary fan regulator can be used with a lamp of 40, 60 or 100 watts and calibrated accordingly. The minimum measurable voltage is naturally limited to the one required for ‘just visible’ condition. With R1 open circuited the maximum scale voltage will be around 220 volts.


Author:  G.D. Sekhri Sourced : EFY

  • Digg
  • Del.icio.us
  • StumbleUpon
  • Reddit
  • RSS

Simple Multicell Charger Circuit Diagram

Using this charger, you can safely charge up to two pieces of Ni-Cd cells or Ni-MH cells. The circuit is compact, inexpensive and easy-to-use.The 230V AC mains is down-converted to 12V AC (at 500 mA) by step-down transformer X1, converted into pulsating DC voltage by diodes D1 and D2, and fed to the battery charger terminals via current-limiting resistor R1 and silicon-controlled rectifier SCR1.

SCR1 is at the heart of the charger. Normally, it conducts due to the gate biasing voltage available through resistor R2 and diode D3, and the battery is in charging mode, which is indicated by LED1. Resistor R2 limits the charging current to a safe value. Charging current of this circuit is about 250 mA.

 Simple Multicell Charger Circuit Diagram


Simple Multicell Charger Circuit Diagram
When the battery reaches full charge, SCR2 conducts to pull down the gate of SCR1. This state is indicated by LED2. Now remove the cells from the charger. Normally, Ni-Cd cell with a rating of 500 mAH will take around 2.5 hours to reach full charge, while the charging time for Ni-MH cell with a rating of 1500 mAH will be around 7 hours. Charging time may vary depending on the settings of the charger and input supply line conditions. 

After construction, a minor adjustment is required for ensuring proper performance: Power on the circuit without cells and adjust VR1 such that LED2 lights up. Now measure voltage across the charger output terminals, which should be around 5V DC. Now insert the two cells into the holder and connect it to the charger output terminals for charging. LED1 instantly lights up to indicate the charging process. If LED1 glows dimly, readjust VR1 for proper glowing of LED1. Now the circuit is ready for use. Use of a small heat-sink is recommended for SCR1.


Sourced by: EFY Author: T.K. Hareendran

  • Digg
  • Del.icio.us
  • StumbleUpon
  • Reddit
  • RSS

Timer for Geyser Circuit Diagram

The circuit comprises a timer IC 555 wired as an astable multivibrator with adjustable time period of 15 seconds. The astable output after inversion by an inverter drives decade counters IC3 and IC4 (each IC 7490) connected in cascade.

 Timer for Geyser Circuit Diagram


The decade counters output is connected to decoders IC5 and IC6 (each IC 7442), respectively. The decoder outputs (Q8 outputs of IC5 and IC6) are fed to inverters and the inverter outputs, in turn, are fed to an AND gate. The AND output is connected to the reset pin of the astable multivibrator built around another timer IC 555 to sound the alarm. Now you can turn off the geyser.

A green LED (LED1) has been used as the power supply indicator. Switch on the timer and the geyser at the same time. When the alarm sounds, it means that the water in the geyser has heated up and can be used.You can assemble the timer circuit on a general-purpose PCB and install it near your bathroom so that both the timer circuit and the geyser can be switched on simultaneously.

After the siren sounds, if required, we can increase the time by another 22 minutes for geyser by resetting the circuit by pushing reset switches S1 and S2 momentarily. If you want to change the preset time of the geyser, the same can be easily done by combining appropriate outputs of IC5 and IC6 using DIP switches (S3 and S4) while keeping in mind IC5 outputs (Q0 through Q9) are spaced 15 seconds apart and IC6 outputs are spaced 150 seconds (2.5 minutes) apart.

Caution. Please note that the timer circuit has no connection with the geyser circuit. The geyser works off 220V AC, while the timer works off 5V DC.

 This timer circuit for geyser sounds an alarm after the set timing of 22 minutes when the water is heated up.


Author V. Gopalakrishnan

  • Digg
  • Del.icio.us
  • StumbleUpon
  • Reddit
  • RSS

Whistle to Call Dogs Dog Caller Circuit Diagram

Dog trainers use a whistle to call dogs. But why blow that irritating, loud whistle when the dog can hear a sound inaudible to the humans? We the humans can hear up to 20 kHz, but dogs can hear ultrasound (sound ranging between 20 and 30 kHz) also. Here’s a circuit that generates 21 to 22 kHz (frequencies just above the audible range), so it can be used to call your pets by generating ultrasonic sound.

Whistle to Call Dogs Dog Caller Circuit Diagram

Whistle to Call Dogs Dog Caller Circuit Diagram


IC 555 is used as an oscillator. By adjusting the preset, ultrasonic sound of 21-22kHz frequency can be generated. Whistle effectiveness depends on the speaker used. Use of a low-wattage tweeter is recommended. (Don’t use an ultrasonic transducer, because it is designed for 40 kHz only.)

The circuit works off 9V. For portability, use a 9V PP3 battery and house the unit inside a pocket radio cabinet.

Author: Pradeep G  www.electronicsforu.com

  • Digg
  • Del.icio.us
  • StumbleUpon
  • Reddit
  • RSS

Simple Brake Failure Indicator Circuit Diagram

This is a Simple Brake Failure Indicator Circuit Diagram that constantly monitors the condition of the brake and gives an audio-visual indication. When the brake is applied, the green LED blinks and the piezo buzzer beeps for around one second if the brake system is intact. If the brake fails, the red LED glows and the buzzer stops beeping.

The circuit will work only in vehicles with negative grounding. It also gives an indication of brake switch failure.

Simple Brake Failure Indicator Circuit Diagram

Simple Brake Failure Indicator Circuit Diagram


In hydraulic brake systems of vehicles, a brake switch is mounted on the brake cylinder to operate the rear brake lamps. The brake switch is fluid-operated and doesn’t function if the fluid pressure drops due to leakage. The fluid leakage cannot be detected easily unless there is a severe pressure drop in the brake pedal. This circuit senses the chance of a brake failure by monitoring the brake switch and reminds you of the condition of the brake every time the brake is applied.

The circuit uses an op-amp IC CA3140 (IC2) as voltage comparator and timer NE555 (IC3) in monostable configuration for alarm. Voltage comparator IC2 senses the voltage level across the brake switch. Its non-inverting input (pin 3) gets half the supply voltage through potential divider resistors R3 and R4 of 10 kilo-ohms each. The inverting input (pin 2) of IC2 is connected to the brake switch through diode D1, IC 7812 (IC1) and resistor R2. It receives a higher voltage when the brake is applied.

Normally, when the brake is not applied, the output of IC2 remains high and the red LED (LED1) glows. The output of IC2 is fed to trigger pin 2 of the monostable through coupling capacitor C2. Resistor R1 is used for the input stability of IC2. IC1 and C1 provide a ripple-free regulated supply to the inverting input of IC2.

IC3 is wired as a monostable to give pulse output of one second. Timing elements R7 and C4 make the output high for one second to activate the buzzer and LED2. Usually, the trigger pin of IC3 is high due to R6 and the buzzer and LED2 remain ‘off.’

When the brake pedal is pressed, pin 2 of IC2 gets a higher voltage from the brake switch and its output goes low to switch off the red LED. The low output of IC2 gives a short negative pulse to the monostable through C2 to trigger it. This activates the buzzer and LED2 to indicate that the brake system is working. When there is pressure drop in the brake system due to leakage, LED1 remains ‘on’ and the buzzer does not sound when the brake is applied.

The circuit can be assembled on any general-purpose PCB or perforated board. Connect point A to that terminal of the brake switch which goes to the brake lamps. The circuit can be powered from the vehicle’s battery.

The circuit requires well-regulated power supply to avoid unwanted triggering while the battery is charging from the dynamo. IC4, C6 and C7 provide regulated 12V to the circuit. The power supply should be taken from the ignition switch and the circuit ground should be clamped to the vehicle’s body. A bicolour LED can be used in place of LED1 and LED2 if desired.


Author: D. MOHAN KUMAR

  • Digg
  • Del.icio.us
  • StumbleUpon
  • Reddit
  • RSS

Simple Multidoor Opening Alarm with Indicator

This door-opening alarm alerts you of intruders. You can use it for up to three doors. You simply need to fit a small unit including reed switch on each doorframe and fix a magnet on the moving door such that the magnet aligns with the reed switch when the door is closed. A separate unit incorporating the power supply, three LEDs and a buzzer is to be kept by your side inside your room. A three-core ribbon cable from this unit goes to each door unit. One core goes to the positive terminal, second to the negative terminal and third to the output of the unit. When the door is closed, the reed switch terminals are shorted and the alarm does not sound.

 Multidoor Opening Alarm with Indicator Circuit Diagram

 Multidoor Opening Alarm with Indicator Circuit Diagram

When door 1 is opened by someone, transistors in the corresponding door unit conduct and the buzzer sounds. LED1 glows to indicate opening of door 1. Due to diode latching action, the alarm will sound continuously even after the door is closed. It can be stopped only by pressing the reset switch of the door unit.

Regulated 9V to 12V DC for operating the circuit is derived from AC mains and fed to the three units mounted on the doors. Battery-backup is also provided. When all the three doors are simultaneously opened, all the three LEDs will glow.

This arrangement can be extended for more doors by increasing the number of door units connected to the audio-visual indication unit.


Author Pardeep G

  • Digg
  • Del.icio.us
  • StumbleUpon
  • Reddit
  • RSS

Build a Rechargeable Torch Based on White LED

Rechargeable torches don’t come without problems. You need to replace the bulbs and charge the batteries frequently. The average incandescent light-emitting diode (LED) based torch, for instance, consumes around 2 watts. Here’s a rechargeable white LED-based torch that consumes just 300 mW and has 60 per cent longer service life than an average incandescent torch.

 Rechargeable Torch Based on White LED Circuit Diagram


 Rechargeable Torch Based on White LED Circuit Diagram

Fig. 1 shows the circuit of the rechargeable white LED-based torch. The reactive impedance of capacitors C1 through C3 (rated for 250V AC) limits the current to the charger circuit. The resistor across the capacitors provides a discharge path for the capacitors after the battery is charged. The red LED1 indicates that the circuit is active for charging.

The torch uses three NiMH rechargeable button cells, each of 1.2V, 225 mAH. A normal recharge will take at least 12 hours. Each full recharge will give a continuous operational time of approximately 2.5 hours. Recharge the battery to full capacity immediately after use to ensure its reliability and durability. The charging current is around 25 mA.

Build a Rechargeable Torch Based on White LED

A voltage booster circuit is required for powering the white LEDs (LED2 through LED4). An inverter circuit is used to achieve voltage boosting. Winding details of the inverter transformer using an insulated ferrite toroidal core is given in the schematic. The number of 35 SWG wire turns in the primary and secondary coils (NP and NS) are 30 and 3, respectively. If the inverter does not oscillate, swap the polarity of either (but not both) the primary or the secondary winding. A reference voltage from resistor R5 provides a reflected biasing to the transistor, and keeps the output constant and regulated. The suggested enclosure for the torch is shown in Fig. 2.


Author: T.A . Babu

  • Digg
  • Del.icio.us
  • StumbleUpon
  • Reddit
  • RSS

Simple Mock Alarm with Call Bell Circuit Diagram

Simple Mock Alarm with Call Bell Circuit Diagram is a fully automatic mock alarm to ward off any intruder to your house. The alarm becomes active at sunset and remains ‘on’ till morning. The flashing light-emitting diodes (LEDs) and beeps from the unit simulate the functioning of a sophisticated alarm system. Besides, the circuit turns on and off a lamp regularly at an interval of 30 minutes throughout the night. It also has a call bell facility.

The circuit is built around CMOS IC CD4060B (IC1), which has an internal oscillator and a 14-stage binary divider to provide a long delay without using a high-value resistor and capacitor.

Press switch S2 to provide 9V power supply to the circuit. During daytime, light-dependent resistor LDR1 offers little resistance and transistor T1 conducts. This drives transistor T2 into the cut-off mode, as its base is pulled to ground via transistor T1. Reset pin 12 of IC1 remains high as long as transistor T2 is cut off. This keeps the oscillator of IC1 (comprising resistors R5 and R6 and capacitor C1) disabled and its outputs remain low. The sensitivity of LDR1 can be adjusted using preset VR1.

 Simple Mock Alarm with Call Bell Circuit Diagram


Simple Mock Alarm with Call Bell Circuit Diagram


When the sunlight decreases in the evening, the resistance of LDR1 increases to cut off transistor T1. This drives transistor T2 into conduction mode and its collector voltage goes low. At the same time, reset pin 12 of IC1 goes low to enable the oscillator of IC1 and the oscillator starts oscillating. The O3 output (pin 7) of IC1 goes high every five seconds to light up the LEDs (LED1 and LED2) and activate the buzzer. Resistor R8 limits the tone produced from the buzzer.

At the same time, O13 output of IC1 (pin 3) goes high every 30 minutes to forward bias transistor T3 to energise relay RL1 and lamp L1 connected to the normally opened (N/O) contacts of relay RL1 glows. This cycle repeats till morning.

The call bell is built around IC 4822 (IC2). Its inbuilt musical tone generator generates different tones at each trigger. The frequency of the tone can be controlled through external components R11 and C2. The output at pin 11 of IC2 is amplified by transistor T4.

When push-to-on switch S1 is pressed once, trigger pin 4 of IC2 gets a positive trigger from the positive rail (reduced by zener diode to 3.3V) via resistor R10 and IC2 starts producing a melody. Resistor R10 limits the current to the trigger pin of IC2 and resistor R12 prevents any false triggering. Zener diode ZD1 provides the 3.3V required for IC 4822.

The circuit works off 9V regulated power supply. Assemble the circuit on any general-purpose PCB and enclose it in a waterproof plastic box with holes for mounting LEDs on the rear and the LDR on the top of the box. Place the LDR such that sunlight falls on it directly. Mount the unit on the pillar of the entrance gate. To avoid unnecessary illumination of the LDR, install lamp L1 away from the unit in the porch of the house. Keep the speaker inside the room.


Aothur D. Mohan Kumar and Thanx Streampowers

  • Digg
  • Del.icio.us
  • StumbleUpon
  • Reddit
  • RSS

5 Most Exciting Gadgets for 2014

5 Most Exciting Gadgets for 2014. 2014’s shaping up to be another game-changing year for tech. Once again, smartphones and tablets are set to become shaper, faster and cooler. But beyond those staples of the scene, there are some hugely exciting new pieces of kit.

Apple iPad Pro

Apple iPad Pro


HTC M8

HTC M8


Apple iWatch

Apple iWatch


Samsung Galaxy Round 2

Samsung Galaxy Round 2


Nintendo Android tablet

Nintendo Android tablet

  • Digg
  • Del.icio.us
  • StumbleUpon
  • Reddit
  • RSS

PS4 Surpasses 2.1-million in sales

PS4 Surpasses 2.1-million in sales

 Sony Computer Entertainment Inc. (SCEI) announced that cumulative sell through for the PlayStation 4 (PS4) worldwide has surpassed 2.1 million units as of December 1, 2013.

The number includes the 700,000 units sold through in Europe and Australasia launching on November 29.
The PS4 system became available on November 15 in the United States and Canada and on November 29 in Europe, Australasia and Latin America and is now available in 32 countries globally.

PS4 delivered the best launch in PlayStation history with the North American release and we’ve continued this incredibly successful start in Europe, Australasia and Latin America,” said Andrew House, President and Group CEO, Sony Computer Entertainment Inc.

“Demand remains incredibly strong and continues to overwhelm the supply worldwide, but we are diligently working to meet those growing demands and to deliver additional PS4 units to our retail partners throughout the holiday season.  We are extremely grateful for the passion of PlayStation fans and thank them for their continued support.”

PS4 consumers embraced the deep social capabilities offered by the PS4 system, including heavy use of live broadcasting on Ustream and Twitch and sharing content through Facebook and Twitter.

The PS4 system’s games portfolio expands in 2014 with games like the highly anticipated franchise favorite inFAMOUS: Second Son and MLB 2014: The Show from SCE WWS, as well as brand new IP including Destiny from Activision, Watch_Dogs from Ubisoft Entertainment, and The Order 1886 and #DRIVECLUB from SCE WWS.

Looking ahead, the PS4 system will evolve through PlayStation’s cloud gaming services, available in the U.S. in 2014.  Based on Gaikai Inc.’s cloud-based technology, the service will enable users to have access to a catalogue of critically acclaimed PlayStation 3 games on PlayStation 4 and PS3, followed by PlayStation Vita.

Sourced by : Sony

  • Digg
  • Del.icio.us
  • StumbleUpon
  • Reddit
  • RSS

Android 4.4.1 Landing soon and Fixes Nexus 5 Camera

Android 4.4.1 Landing soon and Fixes Nexus 5 Camera
 
Android 4.4.1 landing soon and fixes Nexus 5 camera. The Nexus 5 from Google is quite an awesome device, however its camera isn’t the greatest. Even though the Nexus 5′s camera features a optical image stabilization, taking shots from it are painfully slow and generally out-of-focus. Google is aware of this and as per The Verge, a new update scheduled to be released in the next few days fixes a lot of issues with the Nexus 5 camera. They’ve managed to get a hands-on experience with Android 4.4.1 and here is what they have to say:

Speed is a theme for the update, and the Nexus 5′s camera really does feel faster across the board. The app launches a full second quicker than it did before the update, meaning you’ll miss many fewer shots than before. There’s also a new progress indicator in HDR+ mode, which makes the process, longer by necessity, feel a lot more straightforward. It’s the first of what Burke says will be a series of interface changes, as Google tries to make Android cameras a little more controllable and obvious. Right now, nearly every setting is buried under layers of menus, and Burke says Google is working on undoing that.

Update: Google has started rolling out the 4.4.1 update- check your device to see if you have received the update.
 
 
Sourced by: Tech News 

  • Digg
  • Del.icio.us
  • StumbleUpon
  • Reddit
  • RSS

Simple B C with Automatic Switch-off Circuit Diagram

This is a Simple Battery Charger with Automatic Switch-off Circuit Diagram. This lovely charger automatically switches off when your rechargeable batteries reach the full charge.The circuit comprises a bistable multivibrator wired around timer IC 555. The bistable output is fed to an ammeter (via diode D1) and pot meter VR1 before it goes to three Ni-Cd batteries that are to be charged.

Battery Charger with Automatic Switch-off Circuit Diagram

Battery Charger with Automatic Switch-off Circuit Diagram


Normally, the full charge potential of an Ni-Cd cell is 1.2V. Trigger the bistable by pressing switch S1 and adjust potmeter VR1 for 60mA current through the ammeter.

Now remove the ammeter and connect a jumper wire between its points ‘a’ and ‘b.’ Connect the positive output terminal of the batteries to the emitter of pnp transistor T1. The base of transistor T1 is held at 2.9V by adjusting potmeter VR2. The output of transistor T1 is inverted twice by npn transistors T2 and T3.

Thus when the batteries are fully charged to 3×1.2V=3.6V, a voltage higher than this makes transistor T1 to conduct. Transistor T2 also conducts and transistor T3 goes off. The threshold level of timer 555 reaches 6V, which is more than 2/3×VCC = 2/ 3×6=4V, to turn off the timer.

During charging, the threshold level of the timer is held low. The green LED (LED1) glows during charging of the batteries and goes off at the attainment of full charge.

Note that this circuit can be used only for 1.2V, 600mAH Ni-Cd rechargeable batteries that require 60 mA of current for 15 hours to charge fully.


Author : V. Gopalakrishnan

  • Digg
  • Del.icio.us
  • StumbleUpon
  • Reddit
  • RSS

Simple Sixteen Way Clap-Operated Switch Circuit Diagram

This is a Simple Sixteen Way Clap-Operated Switch Circuit Diagram. Control your home appliances without getting out of your bed. You just have to clap in the vicinity of the microphone used in this circuit, which you can keep by the bedside. You can switch on/off up to four different electrical equipment (TV, fan, light, etc) in 16 different ways.This circuit is built around timer IC 555 (IC1), CMOS IC 74LS93 (IC2) and five BC547 npn transistors (T1, T2, T3, T4 and T5). Transistor T1 is used as the preamplifier and the rest are used for driving the relays.

Sixteen Way Clap-Operated Switch Circuit Diagram

 Sixteen Way Clap-Operated Switch Circuit Diagram

A small condenser microphone is connected at the base of transistor T1, which is biased from resistor R1 (10 kilo-ohms). The clapping sound is converted into electrical energy by the microphone and amplified by transistor T1. The transistor output is fed to the monostable circuit wired around IC 555. Output pin 3 of the timer is connected to the clock input of divide-by-16 IC 74LS93.The outputs of IC2 are fed to npn transistors T2, T3, T4 and T5 via 100ohm resistors to drive relays RL1, RL2, RL3 and RL4 connected to appliances 1 though 4, respectively. Freewheeling diodes D1 through D4 connected across the relays protect the transistors from the back electromagnetic field (e.m.f.) produced by the relays.The output states of IC 74LS93 (Q0 through Q3) for different numbers of claps are shown in the table.


The circuit is powered from regulated 5V DC. For testing the circuit, disconnect the resistors from the outputs of IC2 and connect four LEDs in series with 220-ohm resistors between the outputs and ground. Now switch on the power supply and clap near the microphone. You can see the four LEDs glowing in the manner shown in the table. A reset push switch is provided to switch off all the ‘on’ devices. Now you can connect the desired appliances to the relays and control them with your claps.


Sourced and Thanx By: Raj K. Gorkhali

  • Digg
  • Del.icio.us
  • StumbleUpon
  • Reddit
  • RSS